> For the complete documentation index, see [llms.txt](https://docs.spara.com/llms.txt). Markdown versions of documentation pages are available by appending `.md` to page URLs; this page is available as [Markdown](https://docs.spara.com/build/channels/product-demo.md).
# Product Demo
How Spara's Product Demo channel delivers live, voice-narrated product demos to prospects.
The **Product Demo channel** delivers live, interactive product demos over voice. It narrates your product's key features, shows matching screenshots on screen, answers questions naturally, and books a follow-up meeting at the end, all without a rep on the call. It lets every interested visitor get a fast, personalized walkthrough the moment they want one, instead of waiting for a human demo slot.
{% hint style="info" %}
The Spara team can help with initial setup for your Product Demo channel, including a starting prompt, features, screenshots, and opening visual. Once you're live, you have full control over the prompt and all sections described below.
{% endhint %}
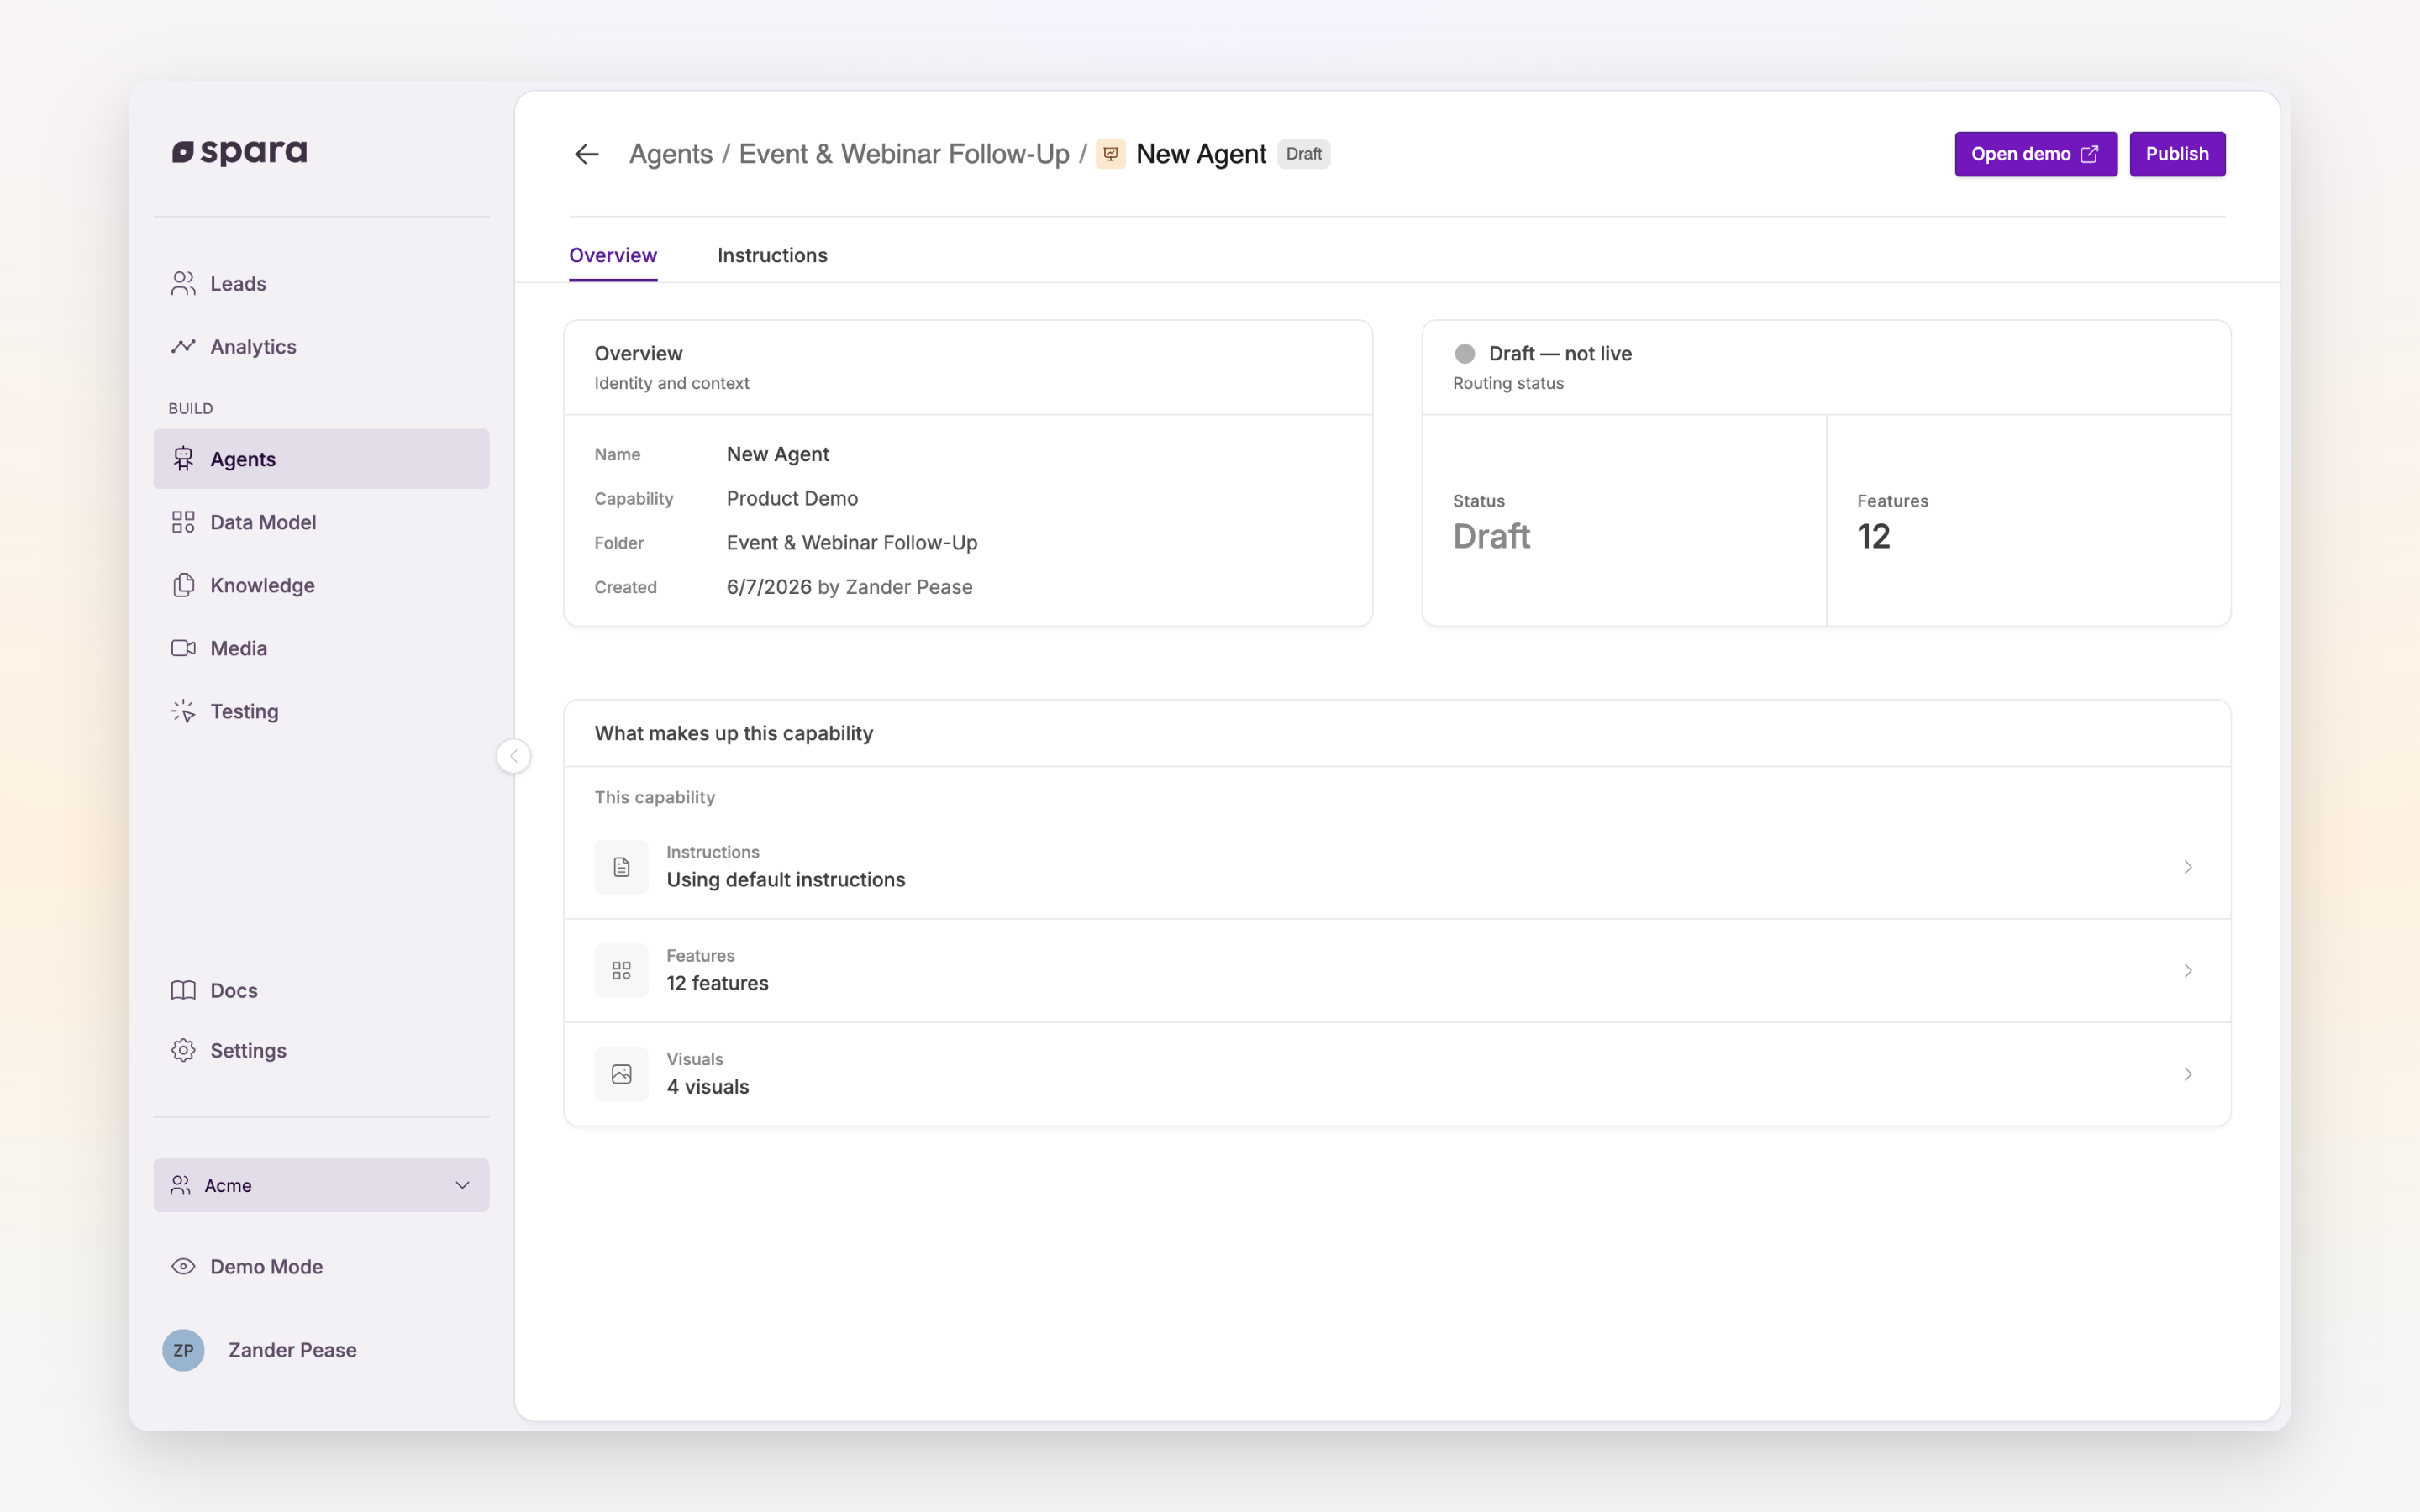
A Product Demo channel's Overview: its instructions, features, and visuals.
## Editing the AI Instructions
The [AI Instructions](/build/channels/configuring/ai-instructions.md) are the natural-language prompt that drives the channel's behavior: how it introduces itself, which features it covers, how it handles pricing questions, and how it wraps up the call. To edit them, open [**Agents**](https://app.spara.co/agents), click into your Product Demo channel, and go to the **Instructions** tab.
The prompt is broken into sections with clear headers. You have full control over all sections.
### Sections
* **IDENTITY AND PRIMARY OBJECTIVE**: who the channel is and what it's trying to accomplish on the call
* **DEMO FLOW**: the order, pacing, and state transitions of the demo
* **DEMO FEATURE PRIORITIES**: default feature order and which features to proactively introduce vs. wait for the prospect to raise
* **FEATURE GUIDANCE**: how the channel navigates visuals within a feature and transitions between features
* **PRICING**: how the channel talks about pricing when a prospect asks
* **DISQUALIFICATION HANDLER**: how the channel responds when a prospect is not a good fit
* **EXISTING CUSTOMER HANDLER**: how the channel handles someone who is already a customer
* **OFF TOPIC AND DISENGAGED VISITOR HANDLER**: how the channel handles off-topic or disengaged visitors
* **BOOKING LOGIC**: when and how the channel nudges toward booking a meeting
* **POST BOOKING FLOW**: qualification questions collected after a meeting is booked
* **WRAP-UP**: how the channel closes the conversation when a meeting is not booked
### Saving and publishing
Save changes to the prompt by clicking **Save draft**. Drafts are safe to iterate on. They don't affect prospects until you publish them, and you can test a draft using the demo link described in [#testing-your-channel](#testing-your-channel "mention").
Click **Publish** when you're happy with the results. The published version is the one your prospects interact with. For more on the draft/publish flow, see [Saving & Publishing](/build/channels/configuring/saving-and-publishing.md).
## Features
A **feature** is a single unit of your demo (one product channel, value proposition, or story) along with the screenshots shown while narrating it. The channel chooses which features to cover and in what order based on what the prospect is interested in, so good feature content is what makes the difference between a generic pitch and a tailored walkthrough.
Features are shared across all Product Demo channels in your account.
### Creating and deleting features
Open your Product Demo channel from [**Agents**](https://app.spara.co/agents), click the **Features** tab, and click **Create new** to add a feature. Click an existing feature to edit it, or use the delete action to remove one you no longer need.
### Editing a feature
Each feature has a **Description** (markdown content the channel reads) and one or more **Visuals** (screenshots or images it can show on screen during the demo).
**Description.** The description is what the language model reads when deciding how to narrate this feature. Keep it dense and concrete. Think "notes for a rep", not marketing copy. Spell out the exact proof points, objection-handling lines, and examples you want it to draw from.
The base prompt is tuned to look for a specific markdown structure in every feature, so sticking with these headers gives the best results:
```markdown
## Hook
## Key Points
## Proof
## Key Q&A
```
Add as much guidance under each header as you need. The more specific, the better the narration will be.
**Visuals.** Every feature should have **at least one visual**. Visuals are the screenshots displayed while narrating this feature. Add more than one if you want to walk through multiple screens for the same feature; leave it at one if the feature is mostly conceptual. Use the visual selector on the feature page to attach assets.
{% hint style="info" %}
A feature without a visual will still work, but there will be nothing to show on screen while it's talking. Prospects get a much better experience when every feature has at least one image tied to it. To capture screenshots from your product, use the [Spara Scanner](/build/channels/product-demo/spara-scanner.md) Chrome extension.
{% endhint %}
## Documents
The **Documents** tab in Product Demo settings lets you upload source documents (PDF, DOCX, or Markdown files) that the demo's ingestion pipeline uses to build knowledge for the channel. Use this for demo-specific reference material (white papers, battlecards, detailed feature specs) that you don't want appearing in the main Knowledge Base. Documents uploaded here are excluded from the Knowledge > Documents tab.
To upload a document, open your Product Demo channel from [**Agents**](https://app.spara.co/agents) and go to the **Documents** tab. Click **Upload** and select a PDF, DOCX, or Markdown file. The document is processed in the background once uploaded. To edit or remove a document, click it in the list to open the edit drawer.
## Theme
Each Product Demo carries its own branding, so two demos in the same workspace can look completely different. Open the demo from [**Agents**](https://app.spara.co/agents) and go to the **Theme** tab.
* **Typography:** The font used throughout the demo. Any Google Font is available.
* **Background:** The page behind the demo canvas and the transcript panel. It is a soft animated backdrop — a gradient, a glow, drifting orbs and a dot grid — and your color re-tints all of it, so pick the hue you want the demo to sit in rather than a flat fill. Leave it empty for Spara's default purple.
* **Chat background:** The transcript panel that sits to the right of the demo canvas (below the canvas on mobile).
* **Bot bubble / Bot text:** The agent's messages in the transcript.
* **Lead bubble / Lead text:** The prospect's own messages in the transcript.
* **CTA background / CTA text:** The call-to-action buttons, such as **Talk to Sales**.
* **Disclosure text:** The messages Spara shows in the demo area itself — "Your demo will appear here" before the first visual, "Your call has ended" afterwards.
* **Border:** Every border on the demo — the visual canvas, the transcript panel, and the chat input.
The **Live preview** below the fields updates as you pick colors, so you can check that your bubble and text colors stay readable together before anyone sees them.
{% hint style="info" %}
The theme is not part of the demo's draft. **Save changes** applies it to the live demo immediately — there is no publish step, and **Discard draft** will not revert it.
{% endhint %}
Duplicating a demo copies its theme. A new demo starts unthemed, which renders in Spara's default colors.
## Opening visual
The opening visual is the first image shown to the prospect when the demo call starts, before the channel begins speaking. To set it, go to your Product Demo channel's details page, open the **Configuration** tab, and use the **Opening Visual** picker to search for and select a visual. If no opening visual is set, prospects will see a blank screen until the channel shows a visual during the demo.
## Auto-open links
Add **`?spara_demo_open`** to any URL on a page that already loads the Spara script, and the demo opens by itself when a visitor arrives:
```
https://yoursite.com/?spara_demo_open
```
That is the whole setup — nothing to configure in the platform and no code to add to your site. Use these links in cold emails, LinkedIn messages, SMS campaigns, or a QR code on a conference booth. The parameter sits alongside your existing ones, so campaign tracking keeps working:
```
https://yoursite.com/pricing?utm_source=email&spara_demo_open
```
To open one specific demo instead of your account's default selection, give the parameter a value:
```
https://yoursite.com/?spara_demo_open=xyz123
```
The value can be either your **agent ID** (splitting traffic across that agent's variants if you run an A/B test) or a **demo ID** (pinning one variant). Spara recognizes both, so you don't need to say which you're using. The agent ID is on the folder icon in the channel header; the demo ID is the last segment of the public demo link, from the copy-link button. If the value matches neither, the demo still opens using your account's published Product Demo channels.
A few things worth knowing:
* The link works on **any** page that loads the Spara script, including pages you've excluded from the chat launcher. A recipient who clicked an auto-open link is asking for the demo, so page rules don't apply.
* While the demo is open the chat launcher is hidden, and it comes back when the visitor closes the demo.
* The demo opens once per page load. A visitor who closes it can reopen it by reloading the link.
* The parameter name is exactly `spara_demo_open`, lowercase.
## Testing your channel
To test a Product Demo channel end-to-end, open it from the [**Agents**](https://app.spara.co/agents) page and click **Open demo**. This launches the demo in a new tab in test mode, running exactly as a prospect would experience it: voice, visuals, calendar booking, and all.
Use it to review your changes before publishing, and share the link with teammates on your Spara account for feedback. The workflow is: click **Save draft**, open the demo, talk through your changes, then click **Publish** once you're happy with how it sounds.
## FAQ
### Who controls what?
The Spara team can help with initial onboarding: a starting prompt, the first set of features, the screenshots tied to each feature, and the opening visual. After that, you have full control over the AI Instructions, the feature descriptions and visuals, the documents, and when to publish changes.
### How do I know if a feature is working?
Open the demo with **Open demo** and ask about that feature directly. Listen for whether it mentions the hook, covers the key points you listed, and uses the right proof. If it's skipping things, tighten up the description and try again.
### Can I test a draft before publishing?
Yes. Click **Save draft**, then click **Open demo**. The demo runs in test mode against your latest saved state, so you can iterate on the prompt and features before clicking **Publish**.
### Can I link directly to the Product Demo from an email or CTA?
Yes. Add `?spara_demo_open` to any page on your site that already loads the Spara script, and the demo opens on its own when the visitor arrives — `https://yoursite.com/?spara_demo_open`. Nothing to install and no code to write. See [Auto-open links](#auto-open-links) above. For a button on your site, call `SparaActions.openProductDemo()` from its click handler instead.
See [Guide: Product Demo Use Cases](https://docs.spara.com/guides/product-demo-use-cases) for step-by-step setup for website CTAs, outgoing email campaigns, chat-to-demo transitions, and more. For the full JavaScript reference, see [Developer: Javascript API](https://docs.spara.com/developers/spara-api/javascript-api).
---
# Agent Instructions
This documentation is published with GitBook. GitBook is the documentation platform designed so that both humans and AI agents can read, navigate, and reason over technical content effectively. Learn more at gitbook.com.
## Querying This Documentation
If you need additional information that is not directly available in this page, you can query the documentation dynamically by asking a question.
Perform an HTTP GET request on the current page URL with the `ask` query parameter, and the optional `goal` query parameter:
```
GET https://docs.spara.com/build/channels/product-demo.md?ask=&goal=
```
`ask` is the immediate question: it should be specific, self-contained, and written in natural language.
`goal` is optional and describes the broader end goal you are ultimately trying to accomplish on behalf of the user. GitBook uses it to tailor the answer towards what is most useful for that goal.
The response will contain a direct answer to the question and relevant excerpts and sources from the documentation.
Use this mechanism when the answer is not explicitly present in the current page, you need clarification or additional context, or you want to retrieve related documentation sections.